Saturday, April 28, 2012

Y is for YES!

Yes!  Yippy! Yahoo!

The end is in sight!
I've been participating in the 
Blogging from A-Z Challenge 
for the last 24+ days 
and now with the letter Y the end is in sight!

What have I taken away from this experience?
  Well, first I found some new blogs that I enjoy reading 
and *met* some new friends.
 I learned a lot about how blogspot works 
just by trying some new things.
Also I rather enjoyed having a starting point with the 
alphabet letters every day.

Unfortunately I only visited about 100 blogs out of the 
over 1700 blog writers who
participated.  From what I read I surmised that 
many of the bloggers participating
were/are writers. 
 In the past most of the blogs that I read are of a crafting/quilting/
do it yourself nature so reading blogs 
written by writers was a new experience.
I found my writing to pale by comparison 
but was also encouraged to work a little
harder at writing.  
This I will probably do when I don't have to write EVERY day.

That's the other thing........
while I sorta enjoyed the discipline of writing every day
I'm not sure that I would like HAVE to write every day.    


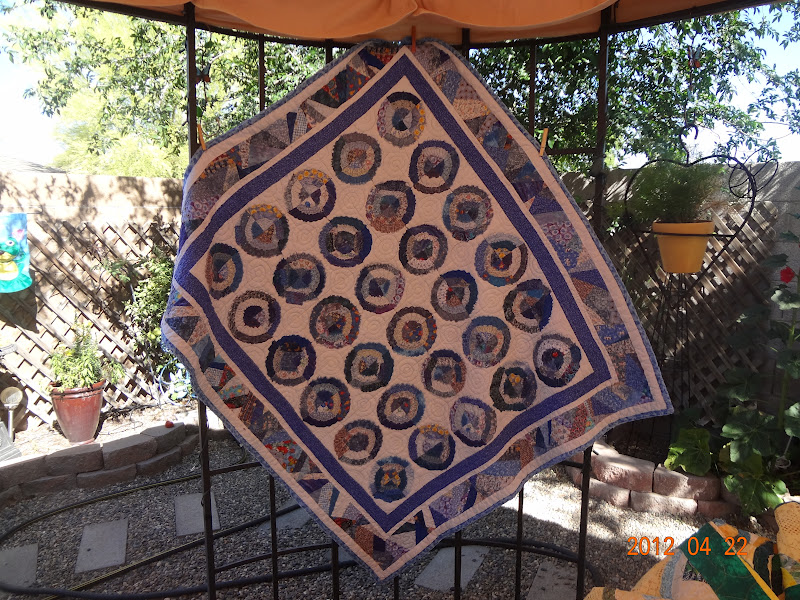
If you look at this quilt just right you can clearly see the Y.
Well, kinda!
This *might* have been better for "x"!
I love working with black and white geometric fabrics.
This quilt was made as an engagement quilt for my daughter.

Well, I think I may be done yapping 
and spinning this yarn for tonight.
Tune in on Monday for the big finish! 
 *Z*!


God Bless,
tammy

Friday, April 27, 2012

X is for eXchange

One of the things that quilters love to do is eXchange things.

We eXchange fabric........Fat quarters, strips, squares......
We eXchange blocks.....pieced blocks, appliqued blocks, paper-pieced blocks.
Sometimes we even eXchange little quilts!

Hearts in the Cabin
This quilt is made with strips eXchanged with the
Friday Night Quilters.
We all made a Log Cabin quilt with the strips.
The guidelines were to make any log cabin pattern using
a red center square.  It was amazing to see how differend
all of the quilt turned out since we were all using the same
fabric strips.
This was a round robin eXchange quilt.  Each of the ladies made the center square
then passed it on to the next person with certain guidelines.
The first border had to be 3" and have triangles.
In the next round  you had to turn the quilt on point and add applique.
The next round had to contain rectangles and the last
round had to include circles.
It was a great challenge!

As part of a Springtime Mini Quilt swap
I received this sweet quilt from
Bec in Australia.

In another Mini Quilt swap I received this little quilt from
Deb in Kodiak Alaska.
Her family are fishermen!

This was a quilt I sent as part of the Mini Quilt swap to
Angela in England


Another Mini Quilt made for a Wintertime eXchange
Backside w/label

Closeup of Sharon's finished Round Robin eXchange

Closeup of Tammy's Round robin eXchange

Closeup of Linda's Round Robin eXchange

Closeup of Kerry's Round Robin eXchange.


Quilty blessings,
tammy

Thursday, April 26, 2012

W is for Words

Words.
Just Words tonight.

Why?  
Well, it seems that my quota for photo storage has been reached!
Imagine that!

A picture is worth a thousand words, or so "they" say.
I enjoy using images to enhance my words.

But tonight you'll just have to use your imagination!
Hopefully I'll be able to paint a picture using only my words.

It's Springtime.
And you know what needs to happen in the Spring, right?
You know, besides birds singing and flowers blooming......
Cleaning......
Spring Cleaning.

Last week I started cleaning my studio so I could host
the Comfort Quilts Sew-In.    Basically I cleaned up the main 
room, just making things tidy, dusting and vacuuming.
~and putting all the overflow in baskets and bins and boxes
and shoving them into another room!~
What?  
That's not cleaning you say?
Ya, I know.

In the days since the Sew-In I've been busy going through those
boxes, bins and baskets and sorting and putting away.
However the main cleaning that I've done in the last 3 days is
sorting though my fabric stash!

(Insert picture here of a closet with fabric overflowing)

(Insert picture of 3 tables, one for ironing, one for sorting 
and one for stacking the sorted fabric)

Can you see it?

Believe me, the picture in my mind's eye was much worse
than it actually was.  And now that the fabric is all sorted
into categories I just can't wait to start using it up!

Now picture if you will a closet with 
fabric neatly folded on one shelf 
and 2 empty shelves below that.
3 tables......the ironing and sorting table is empty
and the sorted fabric stacked in neat little BIG piles
on the 3rd table.  Phew!  All that is left to do is place
the sorted fabric into the 3 empty tubs waiting just for them.


Books and patterns are next...............
Wish me luck!

I miss my pictures...........
Guess I'll be doing some research before "X"!

Wishing you a wild and wonderful day!
tammy


Wednesday, April 25, 2012

V is for virgin

Here it is almost midnight and nothing is written anything for "V" yet.
I've been vacillating all day long on what to write for V.

And now I'm tired.  
And I want to catch some ZZZZZZZ's.  (But "Z" is several days away!)
So this is going to be a short one.  
And probably not a wonderfully written one either.

So it seems that I will have to write about my visit to the dentist today.

My hygienist told me I was a virgin!  
If I wasn't so tired I could probably make this into a joke of some sort...........

Let's see............a woman walks into a bar  dentist's office........

Nah, I'll just lay it out like I was told today.......

I was worried about my teeth after looking at the new
digital x-rays that they can zoom in and enlarge.
(pretty amazing I might add!)
There were quite a few white patches where there are fillings.
My hygienist looked at me and told me not worry.......
my teeth were in great shape 
and I had many, many teeth that were VIRGINS!

When I looked at her in amazement she remarked......
"Yes,  Virgins.....that's what we call teeth that have never been drilled!"

Who knew?

So there you have it!

Pleasant dreams............
tammy


Tuesday, April 24, 2012

U is for UFO's

UNIDENTIFIED FLYING OBJECTS?????

Really?????!!!

Nope.......

In the quilting world UFO's are 

Un Finished Objects.

or PIGS.....

  Projects In Grocery Sacks

or MY favorite........ I'm working on my PHD........

Projects Half Done!!!


Seeing how I have been quilting for the last 30+  years AND I'm a little bit of a  hoarder   collector it goes to figure that I have a number of UFO's, PIGS, and PHD's!


I'm in the process of re-organizing my studio and I'm falling in love all over again with some of the fabric and projects that have been stashed away and unseen by human eyes for probably years!


Here are some of the projects that I can't wait to get my hands on again:

Project started in a class with Sharon Shamber

This cool quilt was a FNQ challenge quilt.
(Friday Night Quilters)
Can you believe that EACH one of these squares is
the EXACT same pattern?


This is a Maple Island pattern called "YIKES"

This was a project started in a design class with Lorraine Torrence

Grandmother's Flower Garden
All those little hexies are first sewn over a paper or plastic hexagon shape
then hand pieced together.
I've been working on this one for MANY, MANY MANY years.
Doesn't look like it does it?

This little quilt is a ?............

Here is a PIG
Project in grocery sack, errrr rather it is in one of those zippered bags
that curtains come in.
This was to be a wedding quilt for my son and daughter-in-law.
They were married in 2007!
Maybe a 10 year anniversary gift?

This was a sorta mystery quilt.


Quilt made for a Ricky Tims class.
We were supposed to quilt on this during class
So glad I made it up before class!

Look what I found!
Another little bullseye quilt top.
Project Linus here I come!


I've had the pieces for this quilt hanging around for YEARS!
It is my brother's Pink Flyod t-shirts.
I want to make it really special and I am having trouble
designing it because of those 2 BIG squares.
guess I need to just jump in and DO IT!

This was scraps from another quilt and
I made this guitar applique to go with it

Sample for a class I was teaching

Log Cabin quilt class taken with Sharon Craig


Hummmmm..........think I have enough projects to finish?
At this rate it will take me YEARS to get my PHD!


Blessings,
tammy

Monday, April 23, 2012

T is for Tutorial


Did you like the Bullseye Quilt  Block?
Well if so you are in luck............
Today's terrific post is a tutorial on how to make
one of your very own.


Blue is one of my favorite colors.
This quilt is named Bullseye Blues and is still in pretty good condition
considering it is over 10 years old and is used daily in the cool months here in Phx.
The kids took this quilt to camp and it is regularly used for bonfires!

In this tutorial I am showing you a Sunflower bullseye block.
However you can choose any color way you like.
In the above blocks I chose an assortment of gray
fabrics to use for my base square and a wide assortment of
bright fabrics to make the bullseyes.

This is what you need:
Required for each block:
One 9' base square
one 8" circle
one 6" circle
one 4" circle
For the 9" base square I chose blue to mimic the sky.
(yah, I know....I should have chosen a light
blue, but I probably used what I had on hand!)
The 8" green circle is the leaves
The 6" yellow circle is the flower
and the 4" brown circle is the flower center.


How do you cut the circles?
I made 8", 6" & 4" templates cut from
cardboard boxes and then drew around these circles on the
back of my fabric with a pencil
then cut them out.

Before I begin sewing I fold each square and circle in half, then quarters
and finger press or iron a crease.
This gives me a placement line.
I want each circle placed in the center.
You can't really see this in the picture above
but the crease lines are there.


After creasing your placement lines and positioning
your 8" circle you will sew 1/4" around the edge of the circle.

Turn your square over and carefully cut away the extra fabric.
This picture show a roughly cut circle cut approx. 1/4" from sewing line

Repeat for each circle

This is what the back side looks like after you sew and cut away each circle

Cut each block into 4 equal sections

Make a bunch of these blocks so when you cut them into
1/4" you can mix and match them.


That's it for tonight...........
Have a blessed evening,

tammy

Sunday, April 22, 2012

S is for Sewing Scraps on Saturday

And those silly scraps spilled into Sunday!
Sorry to be so late with my "S" post!

Saturday my studio was filled with some salty Senoritas
who sewed so many scrap blocks it made my head spin!

We gathered together to sew blocks which will eventually be
made into quilts, then donated to Project Linus,
who in turn will lovingly gift them to children who are sick.  


Liz, Joanne, Pat, Eve, Jodie, Dolly, Jenny, Kathy, Mia  and Roberta (not pictured)
 had their heads down and were working intently!
Eve, the Phoenix West Valley Project Linus coordinator,  joined us today to
fill us in on how the quilts are distributed and all things Project Linus.
A job well done by all!
Thanks ladies!
These are some of the blocks that we cut and sewed in the studio on Saturday.
They are so bright and cheery!
This is what the Bullseye Quilt blocks look like when put together in a quilt.
and  features a scrappy foundation pieced border.
My kids used to take this quilt to camp with them and it has been well loved!


Another example of a scrappy Bullseye Quilt made in school colors.


One of my favorite scrappy Bullseye quilts made to look like
Sunflowers in a field using a blue background like the sky,
a green circle for leaves, a yellow circle for the flower and
a brown circle for the flower's center.

There goes Eve with a smile on her face
and her hands full of quilts
that will someday find a new home
wrapped around a child who needs a hug.

This is MY favorite Scrappy Sewer!
Not quite 2 years old and already comfortable sitting in front of the sewing machine.
Luckily her little legs don't permit her feet to reach the pedal yet!

Tune in Tomorrow for a terrific "T" tutorial.
God Bless,  tammy